January 30, 2011
A Labor of Love, My First Rifle to Keep #7
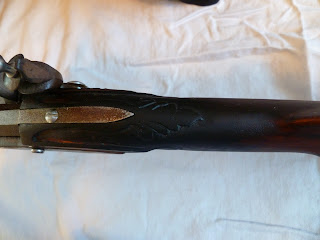
This is the patchbox I have ever installed. When its time to install the patchbox the gun is just about done, so in the past I have been in to much of a hurry to try and also was afraid to screw the gun up. It came out pretty good, some minor gaps. I was also happy with how the engraving turned out.
Here is the buttstock carving, it has not been relieved yet.
Here you can see how fancy this gun will be, carving everywhere.
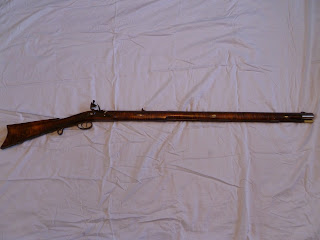
This rifle project is truly a labor of love. I have made five rifles now, four of them being custom guns. I have sold all of them except my first which is a Lyman Great Plains rifle given to me by Jaimie's Dad as a Christmas bonus (the coolest Christmas bonus ever!!). This has always been the gun I shoot with at the Rendezvous's. Don't get me wrong, the gun has always shot well for me. I just want a custom gun that is not just like the guns shooting next to me (there are not many custom guns out there). So that is why this project has been such a labor of love for me. Knowing that this is going to be my gun has heightened the enjoyment of the project immensely. I didn't take pictures from the beginning so there are many steps missing. This gun began a few years ago at Dixon's Gun Builder's Fair in Pennsylvania. I bought a 38" 54 caliber swamped barrel with round bottom rifling by Rice. The stock was just a block of wood I purchased from Freddie Harrison. As you can see it is a pretty piece of wood, although not very expensive compared to many pieces of wood out there(100 bucks). I then gave it to Fred White at the fair and he took it and inletted the barrel and drilled the ramrod hole for me for 90 bucks. He did a really great job! It then sat downstairs for a few years. After Thanksgiving break I was hooked on building guns again and began in earnest working on the guns I already had. Craig told me about a show he was going to at the end of January where he could sell sell some guns for me, so I began finishing what I could to sell. As Christmas rolled around Jaimie offered to get me the rest of the parts to complete my rifle. I decided to make it into a Jacob Dickert rifle that would have been sometime around 1770.
What you are looking at in the picture is the outline I drew on there from a pattern purchased from Track of the Wolf. I then band sawed off the excess, installed the lock, measured for pull, cut the buttstock down, and installed the buttplate.
Here is a picture after hours with the cheese grater to remove a ton of wood. This curly sugar maple is incredibly hard and dense!
I was really nervous about taking a block and getting it into the right shape. You can see my carefully drawn lines to help my shaping.
Its getting closer, you can see the cheek piece beginning to show
Here are my cheek piece lines drawn on the stock.
After a hard Saturday's work it actually looks like a rifle stock!
Here is the other side and I feel it came out pretty good. I would not hesitate to build another one from a block of wood. Having said that I hope I don't mess something up now, although I have done everything from this point on.
I know a picture is hard to show super fine detail, but the wood to metal fit looks like they grew together. Such a rewarding feeling.
50 Caliber 42" Pennsylvania Rifle #5
So far this is my best built rifle. If it had a few different parts I would have been very happy to keep this one (I have yet to keep one). I had Craig take the gun this weekend to try and sell it.
The kit I used was a very low priced kit from Jack Garner. The parts were all good quality but iron instead of brass. The wood for the stock sucked! I was constantly having to fix where it would chip or break. Now I understand what I have read about how frustrating it can be to work with a cheap piece of wood. I am relieved that this gun is finally completed!! I was concerned with using a plain piece of wood that it wouldn't look as good without the curl. I used Aquafortis on this stock and made it dark and sort of uneven in color. I really liked how it came out.
A little bit of incised carving.
My very first attempt at engraving and it looks terrible. I definitely need more practice.
My biggest relief carving yet. I can see many flaws but feel it turned out okay. I need to practice doing more detail to show depth.
The touchhole is a touch high but should still be pretty responsive.
58 Caliber Hawken Fullstock, gun number 4
The brass keys you see hold the barrel in place. A nice feature of a Hawken rifle is the hooked breech. A hooked breech allows a person to remove the keys and take the barrel out for cleaning.
This is probably the prettiest piece of wood I have ever used.
Here is another part of what makes a Hawken such a good choice for an everyday hunting rifle. The long tang allows for two bolts to engage the long trigger bar, thus reinforcing the whole wrist area with steel. The narrow wrist area is the most vulnerable place on the gun. Many old guns wrists were broken because they didn't have this feature.
I'm not sure how this happened, but the touch hole location sucks! I was hoping it was close enough, but Craig looked at it and said it might not fire. As I was planning on selling it I didn't want to go try firing it, so I made a new touch hole that I wish I had taken a picture of. I used a case hardened bolt as the new vent liner. I cut a bigger hole in the barrel, tapped some threads for the new vent liner, drilled out a bit of the inside bolt, and then marked for and drilled the touch hole. I think it will work, but I will do somethings differently next time I make my own touchhole. I will use a bolt that is only part way threaded, cut it the length of thread I want so that where the threads stop and the bolt gets bigger it will give me something to tighten against (on this one I had to take a punch and beat the crap out of the bolt till it expanded enough to keep it from turning). I will then be more precise about marking the center of the bolt and hollow it out as far as I can to allow the powder to sit closer to the pan before cutting off the extra material on the other end. I will leave about an eight of an inch extra so I can cut a slot for a screw driver and then file it off flush with the barrel after installation.
First Pistol, Gun Number 3
We had a few snow days that hooked to Thanksgiving break leaving me wondering what to do with my free time. I decided to finish a pistol I had started a couple of years ago.
It came out pretty good overall.
This was the first gun that I have ever tried carving on, it was fun. I need a lot more practice, but am pleased overall with how it came out.
I stained the wood using Aquafortis. It is an old traditional mixture of water, nitric acid, and steel shavings dissolved into the mix (at least I think that is what it is). The process is to soak the stock with it and then apply heat which burns the wood with acid. The light and dark stripes you see are due to the wood being curly maple. Curly maple has stripes of dense and less dense wood, thus allowing the acid to sink deeper into some parts of the wood. I love this process!
You can see the location of the touch hole is perfect on this gun. The touch hole should be even with a line if it were drawn across the top of the pan. This pistol should be almost instant ignition due to its touch hole location and it being a Jim Chambers White Lightning vent liner.
Subscribe to:
Comments (Atom)


